Getting Started
Usage Agreement
Access to and use of the LARCC/CARDS system is contingent upon you agreeing to acknowledge the system (its supporting grants) in any publications and presentations resulting from work performed in whole or part on LARCC and CARDS and to notify the PIs of these publications by email. The PIs’ request the following language:
“This research was supported in part by the U.S. National Science Foundation (NSF) under grants OAC2430270 and OAC2322248, and the University of Louisville’s Research Computing team.”
HPC system overview
About the cluster
LARCC consists of 20 nodes that can be used for computation. These nodes are distributed in two queues as indicated below:
Queue Name |
Number of servers |
Processor |
CPU core frequency |
CPU sockets per node |
CPU cores per socket |
Total CPU cores per node |
Raw memory |
Usable memory |
GPU |
GPU Memory |
GPUs per node |
Local storage per node |
|---|---|---|---|---|---|---|---|---|---|---|---|---|
compute |
10 |
AMD EPYC 9554 |
3.1 to 3.75 GHz |
2 |
64 |
128 |
512 GiB |
502 GiB |
N/A |
N/A |
0 |
14TB NVMe |
gpu |
10 |
INTEL XEON GOLD 6542Y |
4.1 GHz |
2 |
48 |
96 |
256 GiB |
250 GiB |
NVIDIA H100 NVL |
95830 MiB |
2 |
28TB NVMe |
These nodes are named as follows:
larcc-cpu1,larcc-cpu2, …,larc-cpu10for nodes without any GPU.larcc-gpu1,larcc-gpu2, …,larc-gpu10for nodes with GPUs.
In order to execute any kind of (scientific) software, such as Ansys, OpenFOAM, GROMACS, or others, on these nodes, users must:
Log into a special node referred to hereinafter as the “login node” (see Section Logging into the cluster for more information).
Submit a job declaration to the scheduling system, Slurm. Slurm ensures fair resource distribution among users by managing node allocation, CPU distribution, memory utilization, and other essential resources based on job requirements.
To prevent interference between users’ jobs, access to nodes is restricted
to users with active jobs running on them. For example, if user “lk01” submits a job and
Slurm allocates larcc-cpu1 for its execution, “lk01” will have exclusive access to log into larcc-cpu1.
About Scientific Software
In Linux, program behavior is influenced by dynamic values called “environmental variables”.
These variables can be created, modified, and removed as needed, shaping the functionality
of programs and services. For example, the PATH variable lists directories where binaries are stored.
When a command is executed, the system searches these directories for the corresponding binary.
If not found, it returns a “command not found” error.
Scientific software like GROMACS or OpenFOAM often define their own environmental variables, which can be complex to manage. To simplify this, the cluster uses Environmental Modules to dynamically adjust users’ environments with modulefiles.
Users can explore available modules with the module available command and load
them using module load modulename.
About Jobs
Users can submit two types of jobs: interactive and batch. Interactive jobs give direct access to the assigned node, allowing users to execute programs manually. Batch jobs run autonomously via shell scripts without user intervention.
Batch jobs remain unaffected by disconnections, while interactive jobs may terminate.
To maintain continuity, users can use a terminal multiplexer like tmux.
Running tmux before starting an interactive job creates
a persistent session that continues even if the connection is lost.
Quickstart
Logging into the cluster
Upon creating an account, users are provided with a username and password, which they can utilize to access the cluster via SSH (Secure Shell Protocol). The procedure entails employing an SSH client from their personal computers to establish a connection with the login node.
Using the command line
Windows (versions 10 and 11) inherently supports an SSH command-line client within PowerShell. Similarly, Mac and Linux based operating systems come equipped with a built-in SSH client accessible via their respective terminals. The basic login process remains consistent across all of these platforms:
Launch the terminal on your personal computer.
Enter the ssh command using the following format:
ssh username@hostname. In this particular scenario, the hostname is alwayslarcc.hpc.louisville.edu. For instance, if the user’s name is “lk01”, they would inputssh lk01@larcc.hpc.louisville.edu.
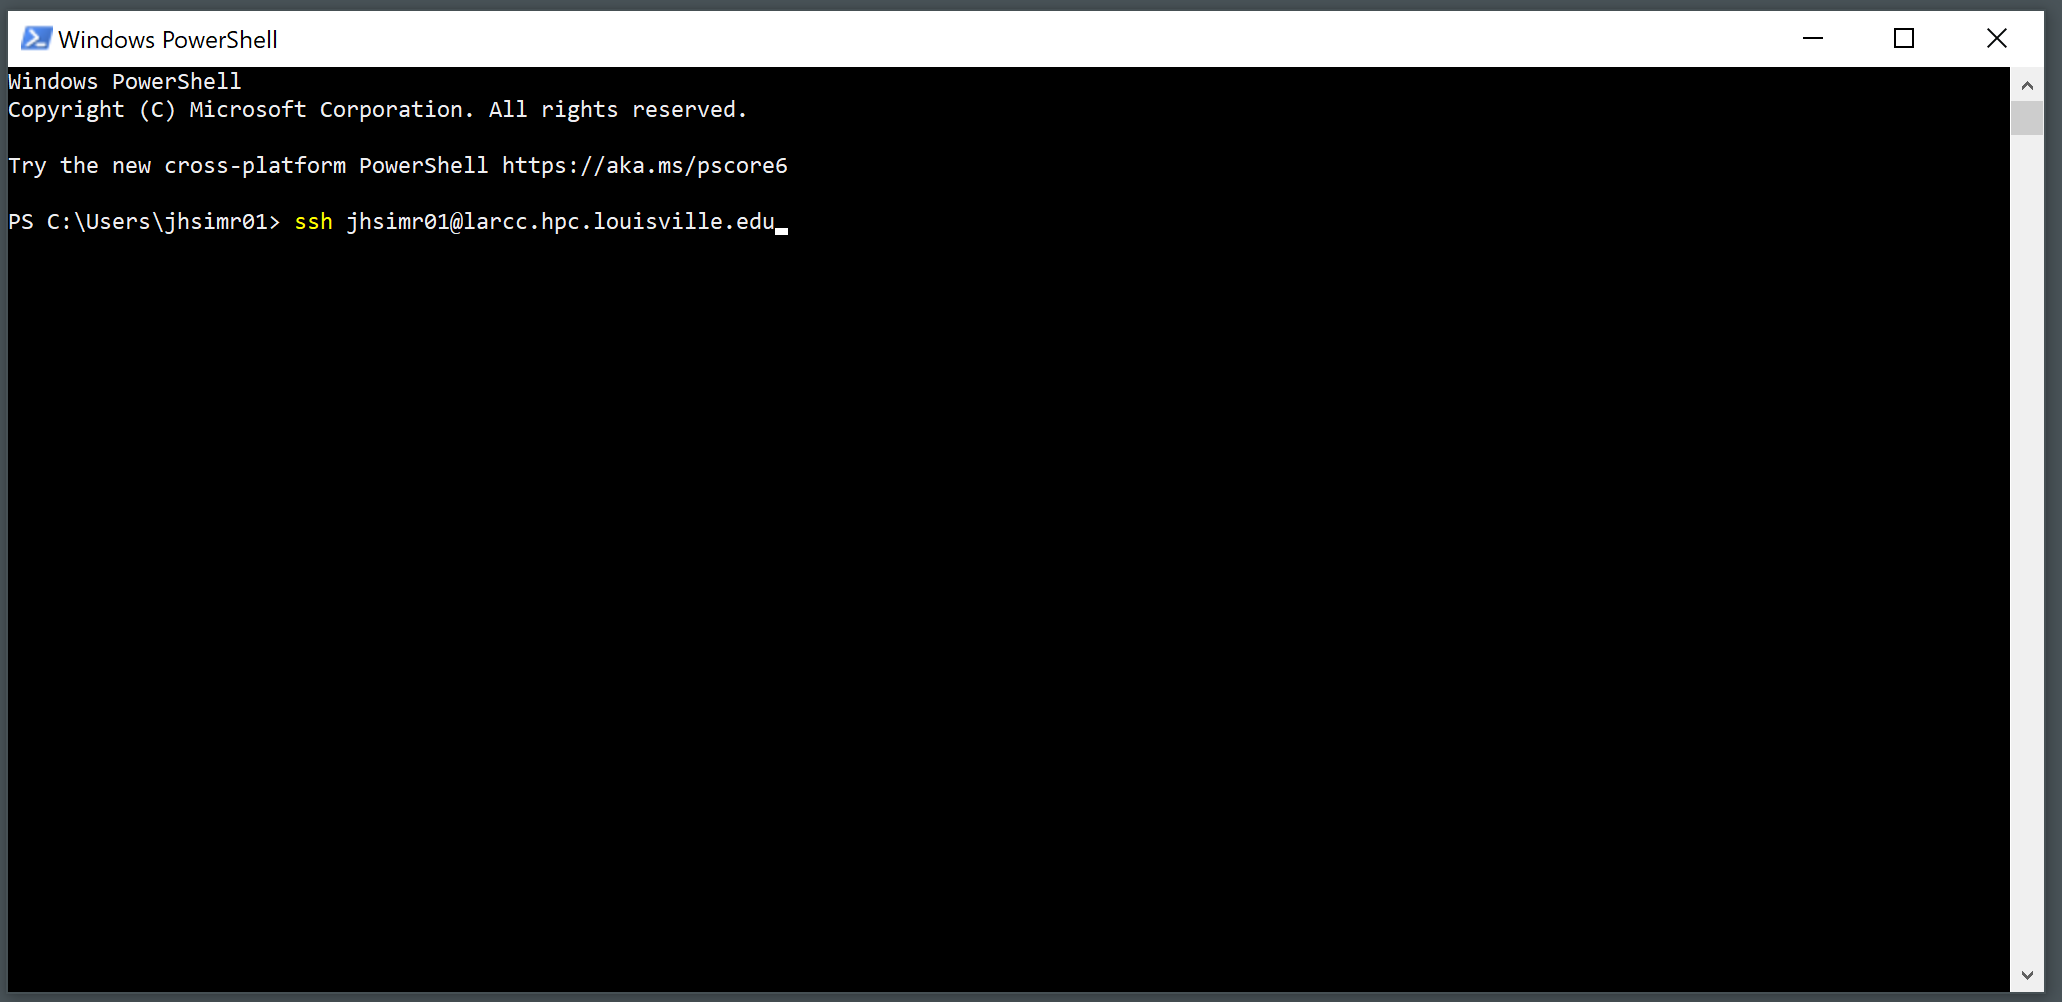
Provide your password and press Enter.
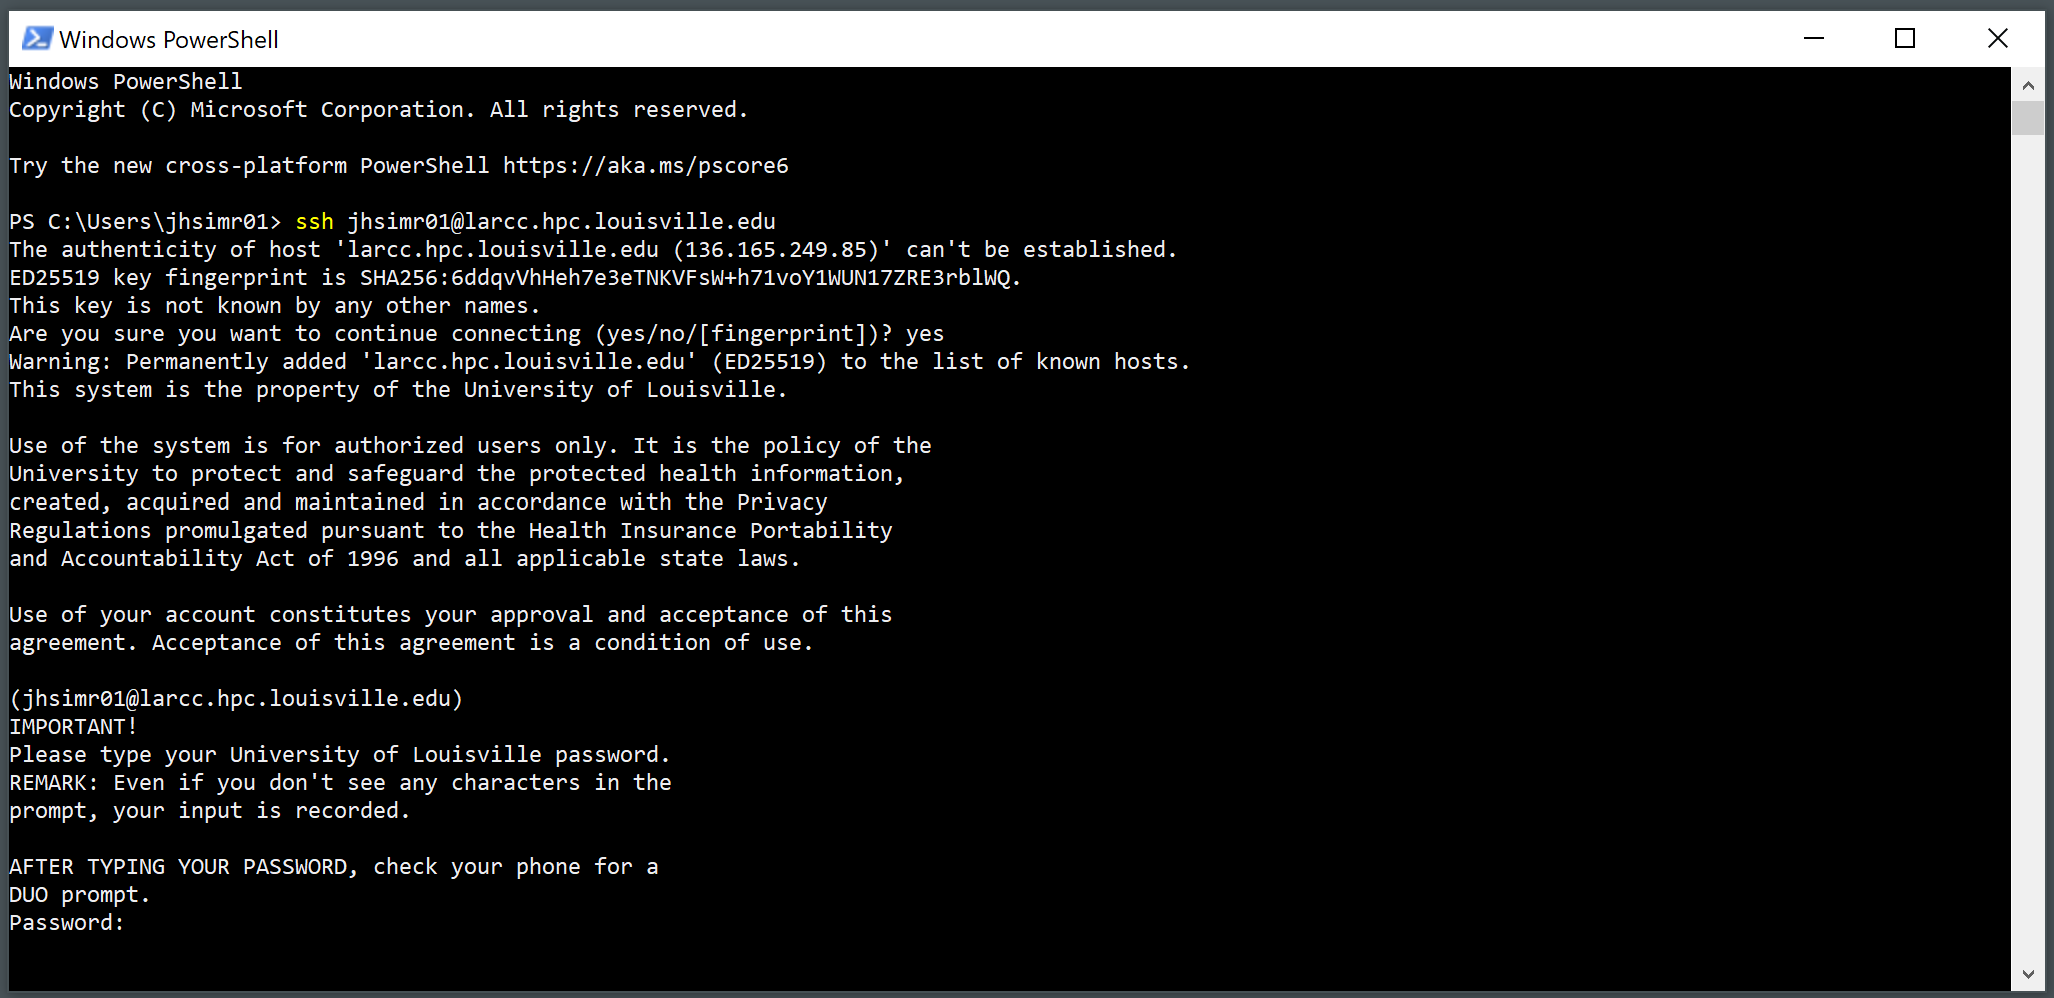
Alternatively, users can opt for other popular SSH clients installed on their personal computers, such as MobaXterm and PuTTY. PuTTY boasts a straightforward and user-friendly interface, while MobaXterm offers a tabbed interface with enhanced functionality, including a dedicated file manager that simplifies file management on the cluster and facilitates seamless information transfer between the personal computer and the cluster.
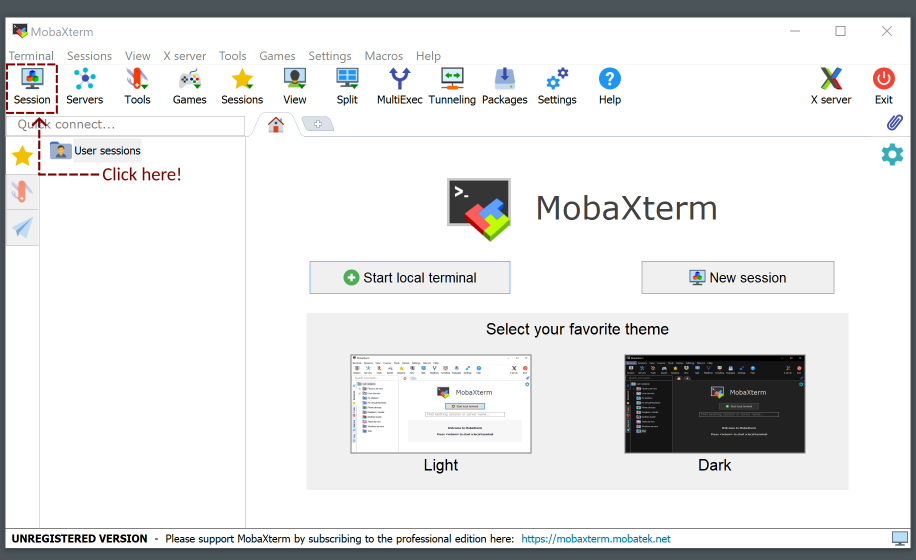
Using MobaXterm
Click on “Session” at the top-left of the window
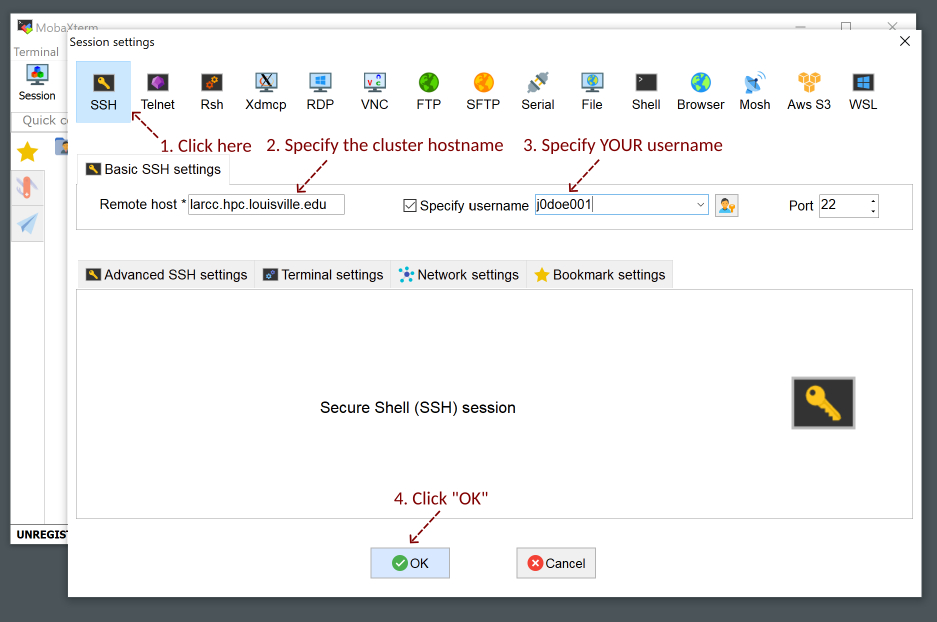
Setup your username and the cluster hostname
larcc.hpc.louisville.edu
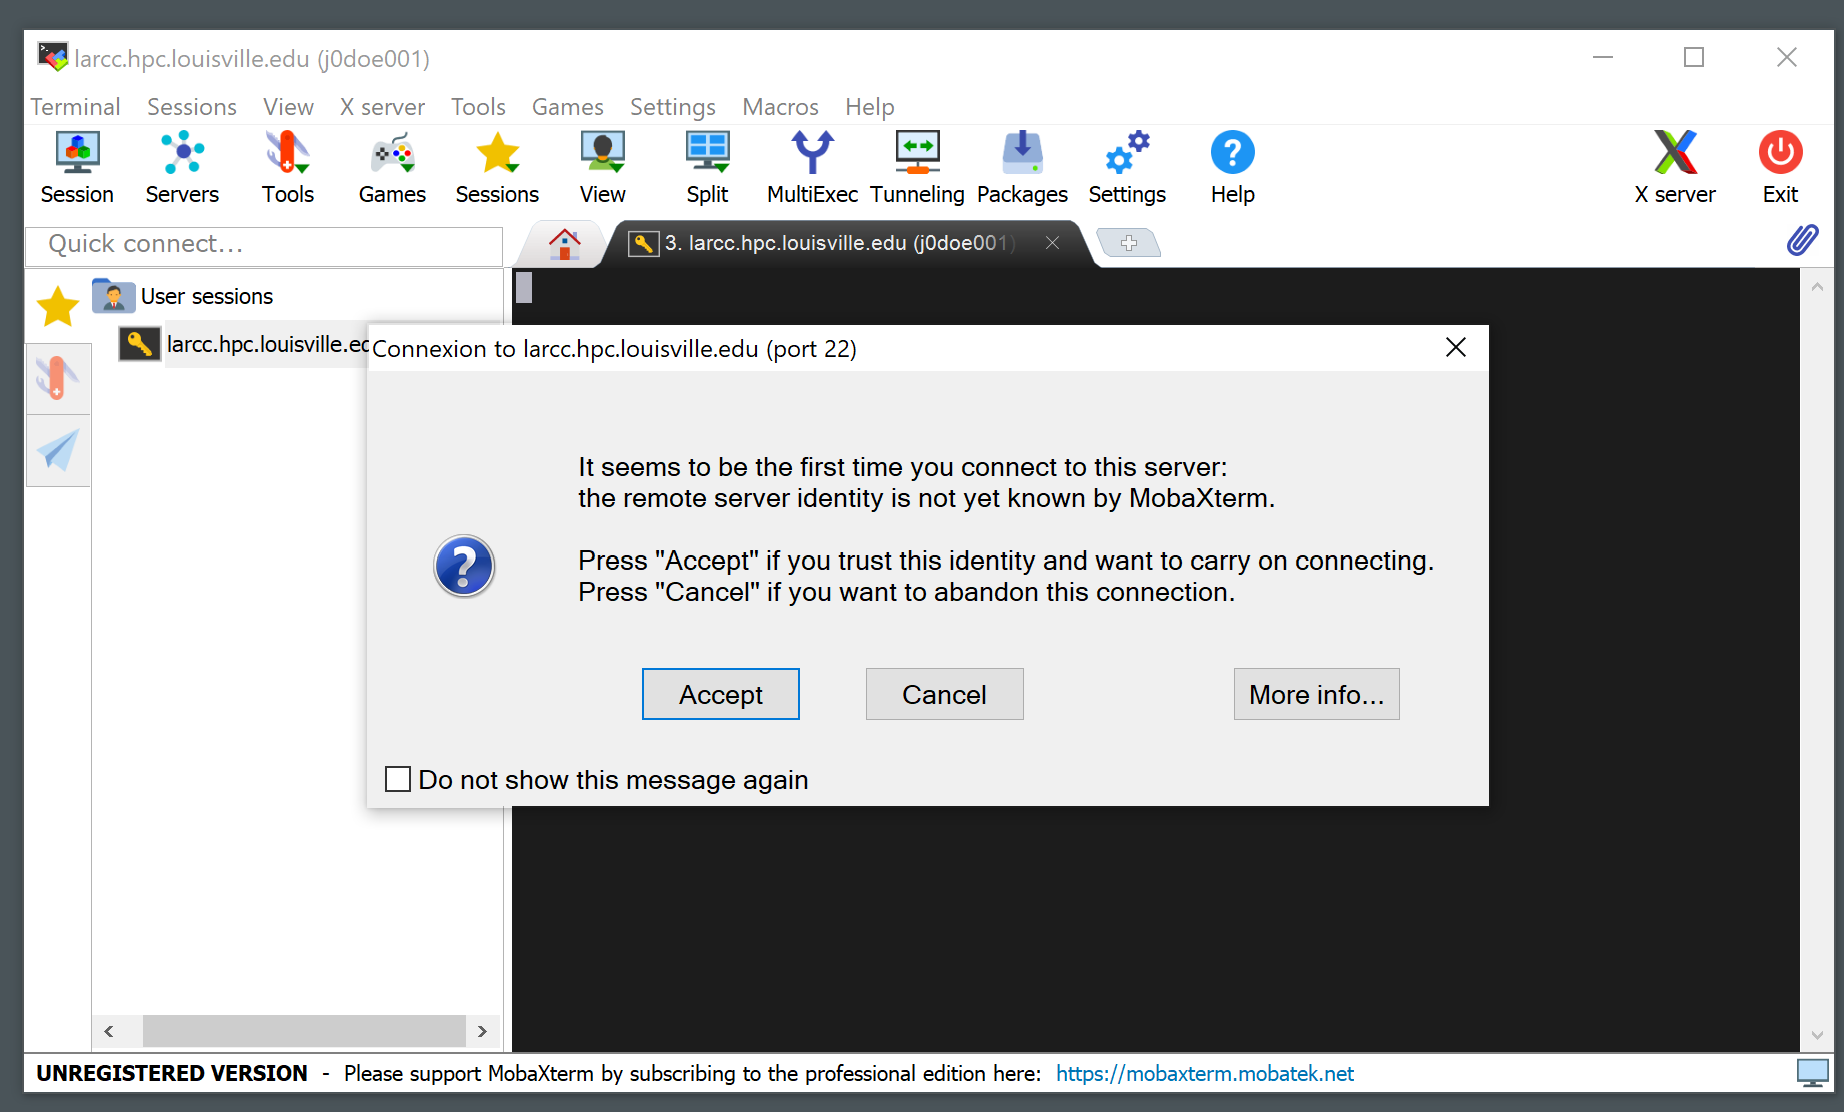
A notice like the one below will appear the first time you connect to the cluster. Click “Accept”.
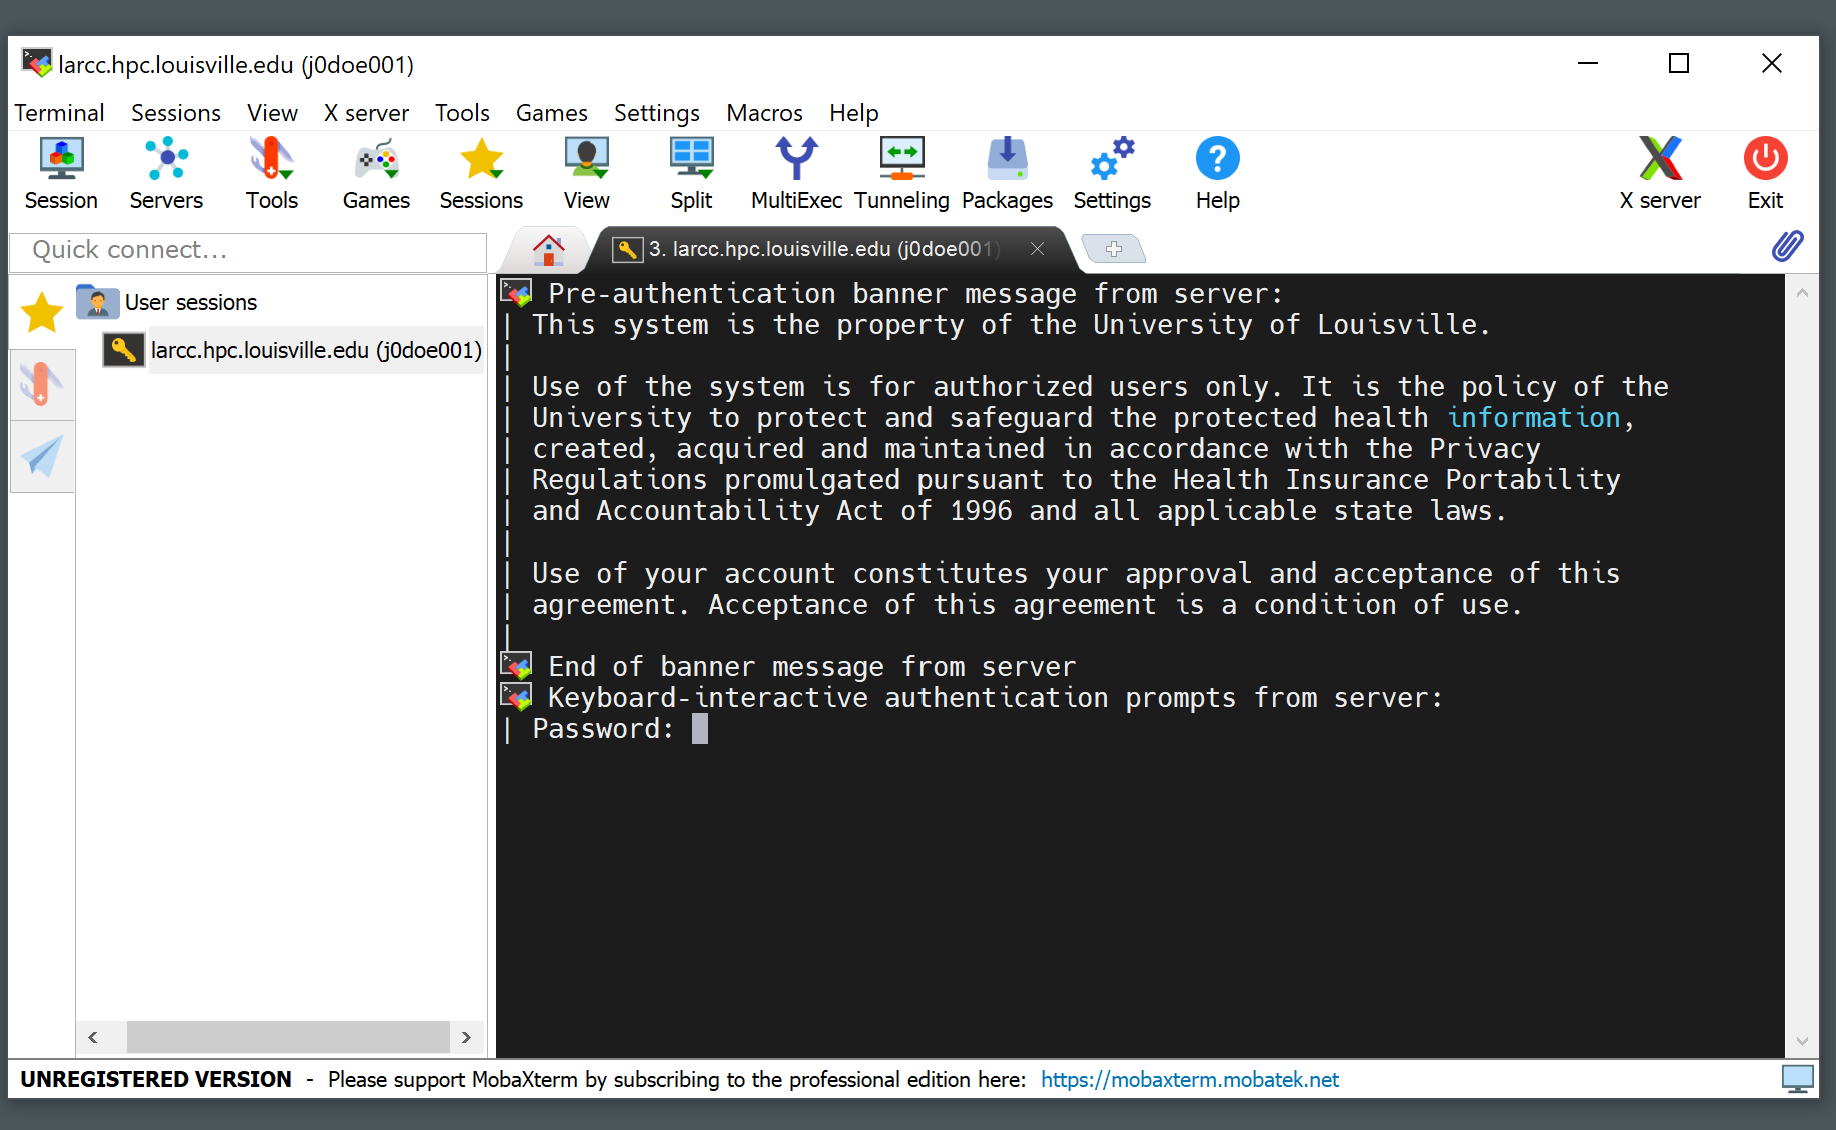
Write your password (it will not be displayed as you type it) and hit Enter
Copying files to/from the cluster
Using the command line
The command scp (available on Windows, Mac and Linux based OSs) is the preferred way
to copy files to and from the cluster. See a comprehensive list of options at the
scp guide. Since a user’s
home directory (/home/<username>, or simply ~) is shared across all nodes, users are encouraged
to use their home directories as a staging area for file transfers.
Example: Assume user “John Doe” is assigned cluster account jd01. The code below
shows how John would copy the file C:\Users\johndoe\Downloads\workload.jou from his
personal computer to his home directory (/home/jd01) in the cluster using the
scp command in Windows PowerShell.
# John could also use ~ instead of /home/jd01. That is, the following is also valid:
# scp C:\Users\johndoe\Downloads\workload.jou jd01@larcc.hpc.louisville.edu:~
scp C:\Users\johndoe\Downloads\workload.jou jd01@larcc.hpc.louisville.edu:/home/jd01
Suppose John Doe ran a simulation and got the results stored at /home/jd01/results/sim_1_res.dat
in the cluster. If he wants to copy these retults to the folder C:\Users\johndoe\Documents
of his Windows PC, he would execute the command below from a PowerShell session:
# The following is also valid:
# scp jd01@larcc.hpc.louisville.edu:~/results/sim_1_res.dat C:\Users\johndoe\Documents
scp jd01@larcc.hpc.louisville.edu:/home/jd01/results/sim_1_res.dat C:\Users\johndoe\Documents
Using MobaXterm
Downloading files or folders from the cluster
Locate the “File Explorer” from MobaXterm and navigate towards the location where the file or folder you want to download resides in.
Right click on the file or folder you want to download from the cluster and click on “Download”.
Uploading files or folders to the cluster
Locate the “File Explorer” from MobaXterm and navigate towards the location where you want to upload your files to.
Click on the upload icon within the “File Explorer” and select the file or folder you want to upload.
Using software installed in the cluster
List available software
Use command module avail as shown in the example below:
  [user@larcc-login1 ~]$ module av

  ------------------------- /opt/shared/modulefiles/auto/linux-rocky9-x86_64/Core --------------------------
     apptainer/1.3.4-gcc-11.5.0-as2nnsb                        miniforge3/24.3.0-0-gcc-11.5.0-wkw4vym
     cuda/12.8.1-gcc-11.5.0-xfem4z6                            mvapich/3.0-gcc-11.5.0-lkmtzx7
     hpl/2.3-oneapi-2025.0.0-intel-oneapi-mpi-e4nh4jf          nvhpc/25.3-gcc-11.5.0-mbzjfew
     intel-oneapi-compilers/2025.0.0-gcc-11.5.0-q7zplj3        openmpi/5.0.5-gcc-11.5.0-5zz5ozl
     intel-oneapi-mkl/2025.0.0-oneapi-2025.0.0-azdrlfn         openmpi/5.0.5-oneapi-2025.0.0-ibqgcsp  (D)
     intel-oneapi-mpi/2021.14.0-oneapi-2025.0.0-qyvyj3p        python/3.12.10-oneapi-2025.0.0-zz5mjcp
     matlab/r2024b-gcc-11.5.0-3dizvwe                          r/4.4.1-gcc-11.5.0-56jqenf
     matlab/r2025a-gcc-11.5.0-cj4bjqf                   (D)

  --------------------------------- /usr/share/lmod/lmod/modulefiles/Core ----------------------------------
     lmod    settarg

    Where:
     D:  Default Module
Load software
Users must load programs with the module load <modulename> before launching them.
Multiple programs can be loaded at the same time, but there are cases where two or more may conflict.
For instance, programs openmpi/5.0.5-gcc-11.5.0-5zz5ozl and openmpi/5.0.5-oneapi-2025.0.0-ibqgcsp
cannot be loaded together.
For such cases the program loaded last is used. An example of this is shown below:
  [user@larcc-login1 ~]$ module load openmpi/5.0.5-gcc-11.5.0-5zz5ozl
  [user@larcc-login1 ~]$ module load openmpi/5.0.5-oneapi-2025.0.0-ibqgcsp

  The following have been reloaded with a version change:
    1) openmpi/5.0.5-gcc-11.5.0-5zz5ozl => openmpi/5.0.5-oneapi-2025.0.0-ibqgcsp

  [user@larcc-login1 ~]$
Warning
Programs MUST only be run through slurm, NOT on the login node (larcc-login1). Users can test their scripts using an interactive job first and then submit the appropriate batch job (See our Slurm Queueing System Guide for more details).
List currently loaded software
Use command module list as shown in the example below:
  [user@larcc-login1 ~]$ module load openmpi/5.0.5-gcc-11.5.0-5zz5ozl
  [user@larcc-login1 ~]$ module list

  Currently Loaded Modules:
    1) glibc/2.34-gcc-11.5.0-4dat34u         (H)  10) openssl/3.2.2-gcc-11.5.0-czvghva    (H)
    2) gcc-runtime/11.5.0-gcc-11.5.0-svvevyo (H)  11) libevent/2.1.12-gcc-11.5.0-cufjpkl  (H)
    3) libpciaccess/0.17-gcc-11.5.0-jgqvvje  (H)  12) libfabric/1.22.0-gcc-11.5.0-5axk6y7 (H)
    4) libiconv/1.17-gcc-11.5.0-vmtcdle      (H)  13) numactl/2.0.18-gcc-11.5.0-zmb5tw7   (H)
    5) xz/5.4.6-gcc-11.5.0-7mfzihn           (H)  14) openssh/8.7p1-gcc-11.5.0-rryqbxc    (H)
    6) zlib-ng/2.2.1-gcc-11.5.0-44cipbd      (H)  15) pmix/5.0.3-gcc-11.5.0-zdm7pmx       (H)
    7) libxml2/2.13.4-gcc-11.5.0-olld6vt     (H)  16) slurm/24.11.4-gcc-11.5.0-tevb6bm    (H)
    8) ncurses/6.5-gcc-11.5.0-stitjip        (H)  17) ucx/1.17.0-gcc-11.5.0-l3qrneo       (H)
    9) hwloc/2.11.1-gcc-11.5.0-a6whu6s       (H)  18) openmpi/5.0.5-gcc-11.5.0-5zz5ozl

    Where:
     H:  Hidden Module
Note
In addition to openmpi/5.0.5-gcc-11.5.0-5zz5ozl, several other programs are listed.
These are dependencies that the module automatically loads alongside OpenMPI.
Dependencies marked with an H are hidden by default.
This means they will not appear when you run the module available command,
even though they are still loaded and available for use.
Unloading software
Use command module unload <modulefile>. This command only unloads the
indicated program, but not its dependencies. To clean the environment and
unload all modules, users should use the command module purge. Example:
  [user@larcc-login1 ~]$ module load openmpi/5.0.5-gcc-11.5.0-5zz5ozl
  [user@larcc-login1 ~]$ module list

  Currently Loaded Modules:
    1) glibc/2.34-gcc-11.5.0-4dat34u         (H)  10) openssl/3.2.2-gcc-11.5.0-czvghva    (H)
    2) gcc-runtime/11.5.0-gcc-11.5.0-svvevyo (H)  11) libevent/2.1.12-gcc-11.5.0-cufjpkl  (H)
    3) libpciaccess/0.17-gcc-11.5.0-jgqvvje  (H)  12) libfabric/1.22.0-gcc-11.5.0-5axk6y7 (H)
    4) libiconv/1.17-gcc-11.5.0-vmtcdle      (H)  13) numactl/2.0.18-gcc-11.5.0-zmb5tw7   (H)
    5) xz/5.4.6-gcc-11.5.0-7mfzihn           (H)  14) openssh/8.7p1-gcc-11.5.0-rryqbxc    (H)
    6) zlib-ng/2.2.1-gcc-11.5.0-44cipbd      (H)  15) pmix/5.0.3-gcc-11.5.0-zdm7pmx       (H)
    7) libxml2/2.13.4-gcc-11.5.0-olld6vt     (H)  16) slurm/24.11.4-gcc-11.5.0-tevb6bm    (H)
    8) ncurses/6.5-gcc-11.5.0-stitjip        (H)  17) ucx/1.17.0-gcc-11.5.0-l3qrneo       (H)
    9) hwloc/2.11.1-gcc-11.5.0-a6whu6s       (H)  18) openmpi/5.0.5-gcc-11.5.0-5zz5ozl

    Where:
     H:  Hidden Module


  [user@larcc-login1 ~]$ module purge
  [user@larcc-login1 ~]$ module list
  No modules loaded
  [user@larcc-login1 ~]$
Queues and jobs
The cluster has two queues named compute and gpu.
To see information about queues, users can use the
sinfocommand.When users send jobs, they can monitor their job status using the
squeuecommand.To launch an interactive job, users can user the
srun --time=<walltime> --pty /bin/bash -icommand. See Section Starting an interactive job for more information.To submit an unattended job, users can use the command
sbatchas follows:sbatch /path/to/sbatch/script. See Section Submitting batch jobs for more informationTo cancel jobs, users can use the
scancelcommand as follows:scancel jobid
Policies
Installing packages system-wide
The Research Computing team reviews software installation requests on a case-by-case basis to determine whether an application should be installed system-wide or is better suited for local installation in a user’s home directory. In the latter case, we are happy to provide guidance.
Please note that global installations can be time-consuming due to complex dependency chains. If a package definition does not already exist, we must create one to automate the build process, including definitions for all dependencies. Since these dependencies are often maintained by different teams, compiling and integrating them can be challenging and time-intensive.
While environment modules make it easy to load software, they are not part of the package-building or automation process.
Due to the high volume of requests, we prioritize faster solutions like Conda and reserve global installations for cases where no suitable alternative exists.
Running applications on the login nodes
Users should avoid running resource-intensive workloads on the login nodes, as this can degrade performance and hinder others from accessing the cluster or submitting jobs. To maintain a stable and fair environment, the Research Computing Team reserves the right to terminate any user processes on the login nodes that are found to negatively impact other users.
Resource restrictions
Note
Please note that exceptions to the restrictions described below CAN be made.
If your workload needs to be given more time to run, you need to use more nodes than what is allowed by default, among others, please reach out to us by creating a ticket and we will be happy to evaluate your case.
Job runtime restrictions
If the
--timeoption is not specified when submitting a job, a default runtime of 12 hours is imposed on said job. This applies to both interactive and batch jobs.Jobs sent to the
computepartition can only run for a maximum of 72 hours.Jobs sent to the
gpupartition can only run for a maximum of 48 hours.Users can use a maximum of 2 nodes (across all partitions) at a given time. For example:
Consider user jd01 submits 2 jobs named A and B such that job A requests a node from the
computepartition and B from thegpupartition. Once both jobs start running, any subsequent job jd01 submits will be queued (i.e. placed inPENDING, orPD, status). Here is an example of how the output of thesqueuecommand would look like:JOBID PARTITION NAME USER ST TIME NODES NODELIST(REASON) 800 compute A jd01 R 1-21:32:01 1 larcc-cpu1 799 gpu B jd01 R 1-21:32:22 1 larcc-gpu1 821 gpu C jd01 PD 0:00 1 (QOSMaxNodePerUserLimit)
Users can submit a maximum of 20 jobs across all partitions.
Storage restrictions
homestorage has a quota of 1TB per user.If multiple users from a research lab require a shared space where they can all colaborate, their PI (i.e. research coordinator, advisor, etc.) must reach out to us through a ticket. We will then evaluate the case and discuss storage capacity, allowed users, among others.
For more information about capacity, storage types, etc., users are encouraged to read our storage guide.