Storage Guide
Understanding Storage on Compute Nodes
Storage types based on node accessibility
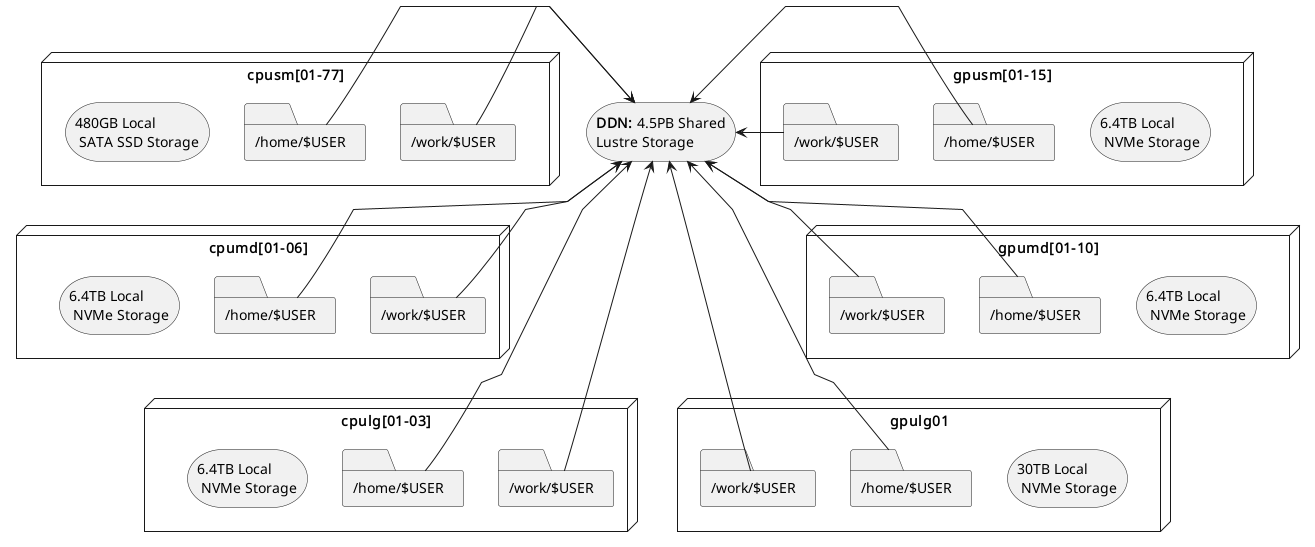
When working on any compute node within the system, there are two types of storage accessible to a node: local storage and shared storage. The former is only accessible by a particular node, while the latter is accessible by all nodes.
On every node, the path /mnt/local/scratch/$USER points to local storage. That means if you have two nodes N1 and N2,
anything stored at /mnt/local/scratch/$USER in N1 won’t be accessible by N2 and vice-versa. In contrast, the
paths /work/$USER and /home/$USER point to a location in shared storage and are thus accessible by both N1 and N2.
The described storage architecture is depicted in the diagram below:
Filesystem locations users should understand
Scratch
Location on compute nodes:
/mnt/local/scratch/$USER.Shortcut Variable:
$SCRATCHLocal to each compute node: This storage is temporary, and local to a compute node. It is available to a user only when a node is assigned for running jobs
High performance: Offers significantly faster read/write speeds compared to home and work storage.
Limited capacity: the capacity varies as per the node type and can be anywhere between 480 GB to 30 TB. Please refer to the table on the Zurada hardware specs for details
Data retention policy: ALL DATA IS REMOVED after a job finishes.
Work
Location in filesystem:
/work/$USER.Shortcut Variable:
$WORKShared across all nodes: Accessible from any compute node in the system.
Large capacity: Designed to store big files, datasets and, in general, input/output files used/produced by a job.
Slower access: Due to its shared nature, read/write operations are generally slower than scratch storage.
Parallel I/O: Multiple parts of large files can be accessed simultaneously (e.g. MPI-IO).
Data retention policy: Files not accessed within 30 days are candidate for deletion.
Home
Location in filesystem:
/home/$USER.Shortcut Variable:
$HOMEor~Shared across all nodes: Accessible from any compute node in the system.
Limited capacity: Hard quota limit of 25GB per user. If you try to write more than 25G, an error will be displayed and any subsequent write operations will be denied.
Slower access: Due to its shared nature, read/write operations are generally slower than local scratch storage.
Data retention policy: Data is kept and backed up for 7 days.
Note
Shortcut variables in bash are set upon entry to a Zurada node, so you may utilize them while inside the system (scripts, navigation, etc). If you are using a command (ex. scp, or rsync) from your laptop/desktop utilization of the shortcut variables will not work.
Recommended Workflow
A common and efficient workflow for running jobs on the system is:
Prepare Input Data: Copy necessary input files from your home or work storage to the node’s local scratch storage at the start of your job.
Run the Application: Configure your application to read from and write to the local scratch storage during execution. This takes advantage of its high-speed performance.
Save Results: Once the job completes, copy the output files back to your work directory for longer term retention, or to home directory if you want them backed up.
See Section Copying data between home and scratch for more information on how to implement this worflow.
Note
Always ensure that your input and output data will fit within the available space on scratch storage.
If your files exceed this capacity, you may need to adjust your workflow accordingly.
Copying Data Between Home and Scratch
To efficiently transfer data between your shared home storage and node-local scratch storage, you can use pdsh—a parallel remote shell client that executes commands across multiple nodes simultaneously.
The general template for the pdsh command includes three key components:
-R ssh: Specifies SSH as the remote shell method (always usessh).-w $SLURM_JOB_NODELIST: Targets all nodes allocated to your job.Remote command: Executes on each node, leveraging the fact that
homeis shared whilescratchis local.
Note
Please note that while we talk about copying from home in this section, you may utilize your work
directory to copy to node-local scratch as well. Using your work directory might even be prefered given
the size limitations of home.
Below are common usage patterns:
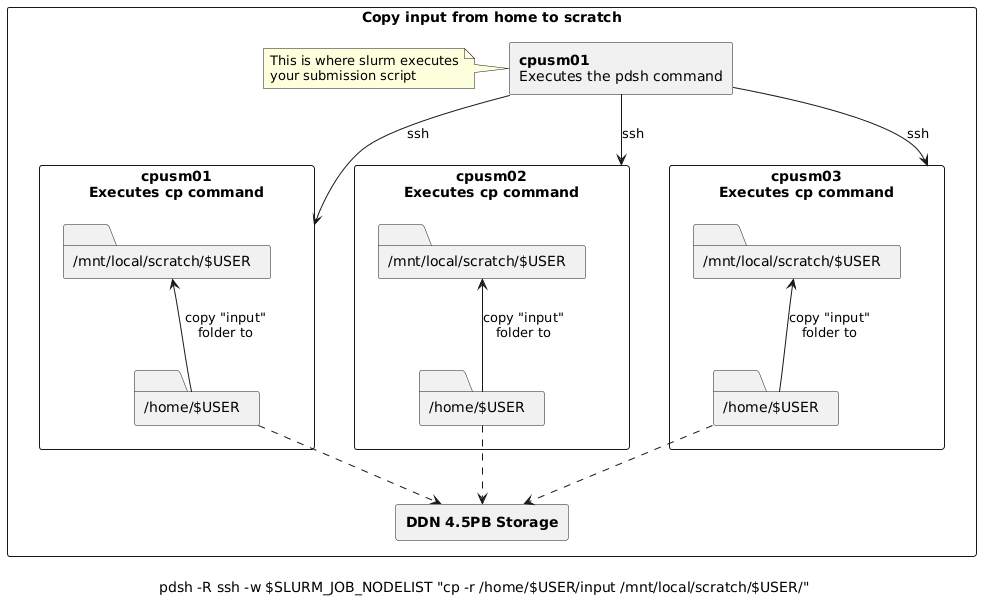
Copy input data from home to scratch on all nodes
pdsh -R ssh -w $SLURM_JOB_NODELIST "cp -r /home/$USER/input /mnt/local/scratch/$USER/"
For example, assume you submitted a batch job requesting 3 nodes and slurm allocated cpusm[01-03] such
that cpusm01 is chosen as the node where the batch script is to be executed from. Then, the pdsh
command above would:
Create 3 (parallel) ssh sessions from
cpusm01to itself,cpusm02andcpusm03.Within each session, instruct the node to copy the folder
/home/$USER/inputto/mnt/local/scratch/$USER/
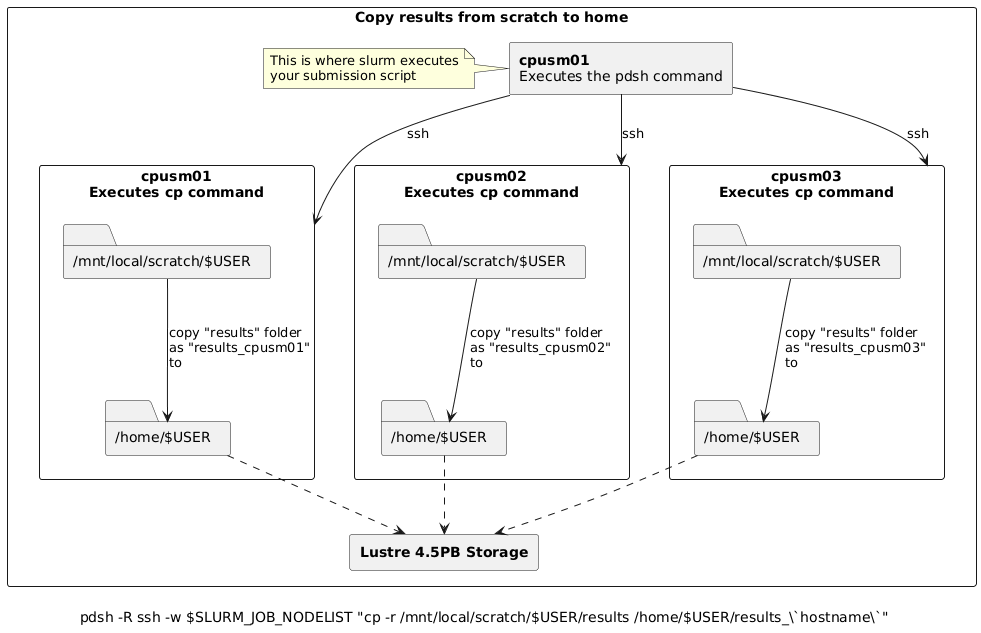
Copy results from scratch to home
Warning
When copying results back to home, ensure unique filenames or directories to prevent nodes from overwriting each other’s output.
The commands below use the node’s hostname as a suffix to avoid conflicts.
# Copy results from scratch to home, appending hostname to avoid overwrites
pdsh -R ssh -w $SLURM_JOB_NODELIST "cp -r /mnt/local/scratch/$USER/results /home/$USER/results_\`hostname\`"

# Alternatively, move results from scratch to home
pdsh -R ssh -w $SLURM_JOB_NODELIST "mv /mnt/local/scratch/$USER/results /home/$USER/results_\`hostname\`"
For example, assume you submitted a batch job requesting 3 nodes and slurm allocated cpusm[01-03] such
that cpusm01 is chosen as the node where the batch script is to be executed from. Then, the pdsh
commands above would:
Create 3 (parallel) ssh sessions from
cpusm01to itself,cpusm02andcpusm03.Within each session, instruct the node to copy (or move if using
mv) the folder/mnt/local/scratch/$USER/resultsto/home/$USER/, appending_followed by the node’s hostname to the copy. i.e.,# cpusm01 executes: cp -r /mnt/local/scratch/$USER/results /home/$USER/results_cpusm01 # cpusm02 executes: cp -r /mnt/local/scratch/$USER/results /home/$USER/results_cpusm02 # cpusm03 executes: cp -r /mnt/local/scratch/$USER/results /home/$USER/results_cpusm03
Simplified Copy for Aggregated Results
If your application aggregates results on the submission node (e.g., via MPI reduction), and per-node outputs are not needed,
you can use a standard copy command instead of pdsh.
Batch Script Example
Here’s how this workflow fits into a typical Slurm batch script:
#!/bin/bash
#SBATCH ...

# Copy input to scratch
pdsh -R ssh -w $SLURM_JOB_NODELIST "cp -r /home/$USER/input /mnt/local/scratch/$USER/"

# Run your application
# ...

# Copy results back to home
pdsh -R ssh -w $SLURM_JOB_NODELIST "cp -r /mnt/local/scratch/$USER/results /home/$USER/results_\`hostname\`"
For aggregated results (e.g., via MPI reduction):
#!/bin/bash
#SBATCH ...

# Copy input to scratch
pdsh -R ssh -w $SLURM_JOB_NODELIST "cp -r /home/$USER/input /mnt/local/scratch/$USER/"

# Run your application
# ...

# Copy final results from scratch to home
cp -r /mnt/local/scratch/$USER/results /home/$USER/